Monokee and iProov have integrated their technologies to make face verification an authentication method inside Monokee’s low/no-code identity orchestration platform. The two solutions complement each other: industry-leading IAM on one side, biometric face verification on the other, combined into one end-to-end flow.
What each side brings
Monokee orchestrates identity: authentication, authorization, user management and access control coordinated in one place. Drag-and-drop blocks, pre-built templates and visual tools let complex identity workflows be configured without extensive coding.
iProov is a science-based facial verification solution that protects security-conscious organisations from deepfakes and other forms of identity fraud. Its patented liveness technology and active threat management assure that an individual is the right person, a real person, and authenticating right now.
What the integration produces
A better experience
The laptop camera works directly. Alongside the existing smartphone scanning method, users can verify with their laptop camera through the Monokee platform. That removes the need for a second device, speeds the process up, and improves accessibility for people who do not have a smartphone or would rather not use one. It also makes shared corporate devices — factories, offices — usable for secure authentication.
Mobile stays consistent. Users on a mobile device get the same face verification without installing an external application, so the experience does not change with the device.
Accessibility and flexibility
Enrolment happens once, through a dedicated flow. From then on everything is set up for iProov to be used in all future authentications, which is what keeps friction at the start rather than spreading it across every login. The solution supports a wide range of devices and platforms.
Stronger security
iProov’s technology is trusted by organisations worldwide, including the Department of Homeland Security and UBS, to prevent identity fraud and to defend against deepfakes with attack detection. For the identity programme, it makes multifactor and passwordless authentication straightforward to enable using the inherence factor — something you are — alongside or instead of traditional methods.
A worked example: reaching a SAML application
Consider a sales representative at a global company using a SAML application such as Salesforce, reached through the Monokee platform. Here is what happens when face verification protects that access:
- Accessing the application via Monokee. The user selects the target application. Monokee’s authentication flow is triggered and prompts the face verification step before access is granted.
- Authentication check. The user is already authenticated on the platform, so the system retrieves their existing data and confirms their identity without asking for further credentials.
- Obtaining the iProov token. The process is identified and secured by an access token retrieved from the iProov service provider and held on the backend.
- Initialising the iProov instance. A new instance is created and the user’s page updated.
- Performing the face scan. The user sees the Monokee frontend form with the iProov scan button, and completes the scan with the laptop camera.
- Verifying the result. Monokee checks the outcome with the iProov service provider, using the token obtained earlier.
- Successful login. The session is authenticated and the user reaches the application, with their identity confirmed by face verification rather than by a password.
How it is built: two flows
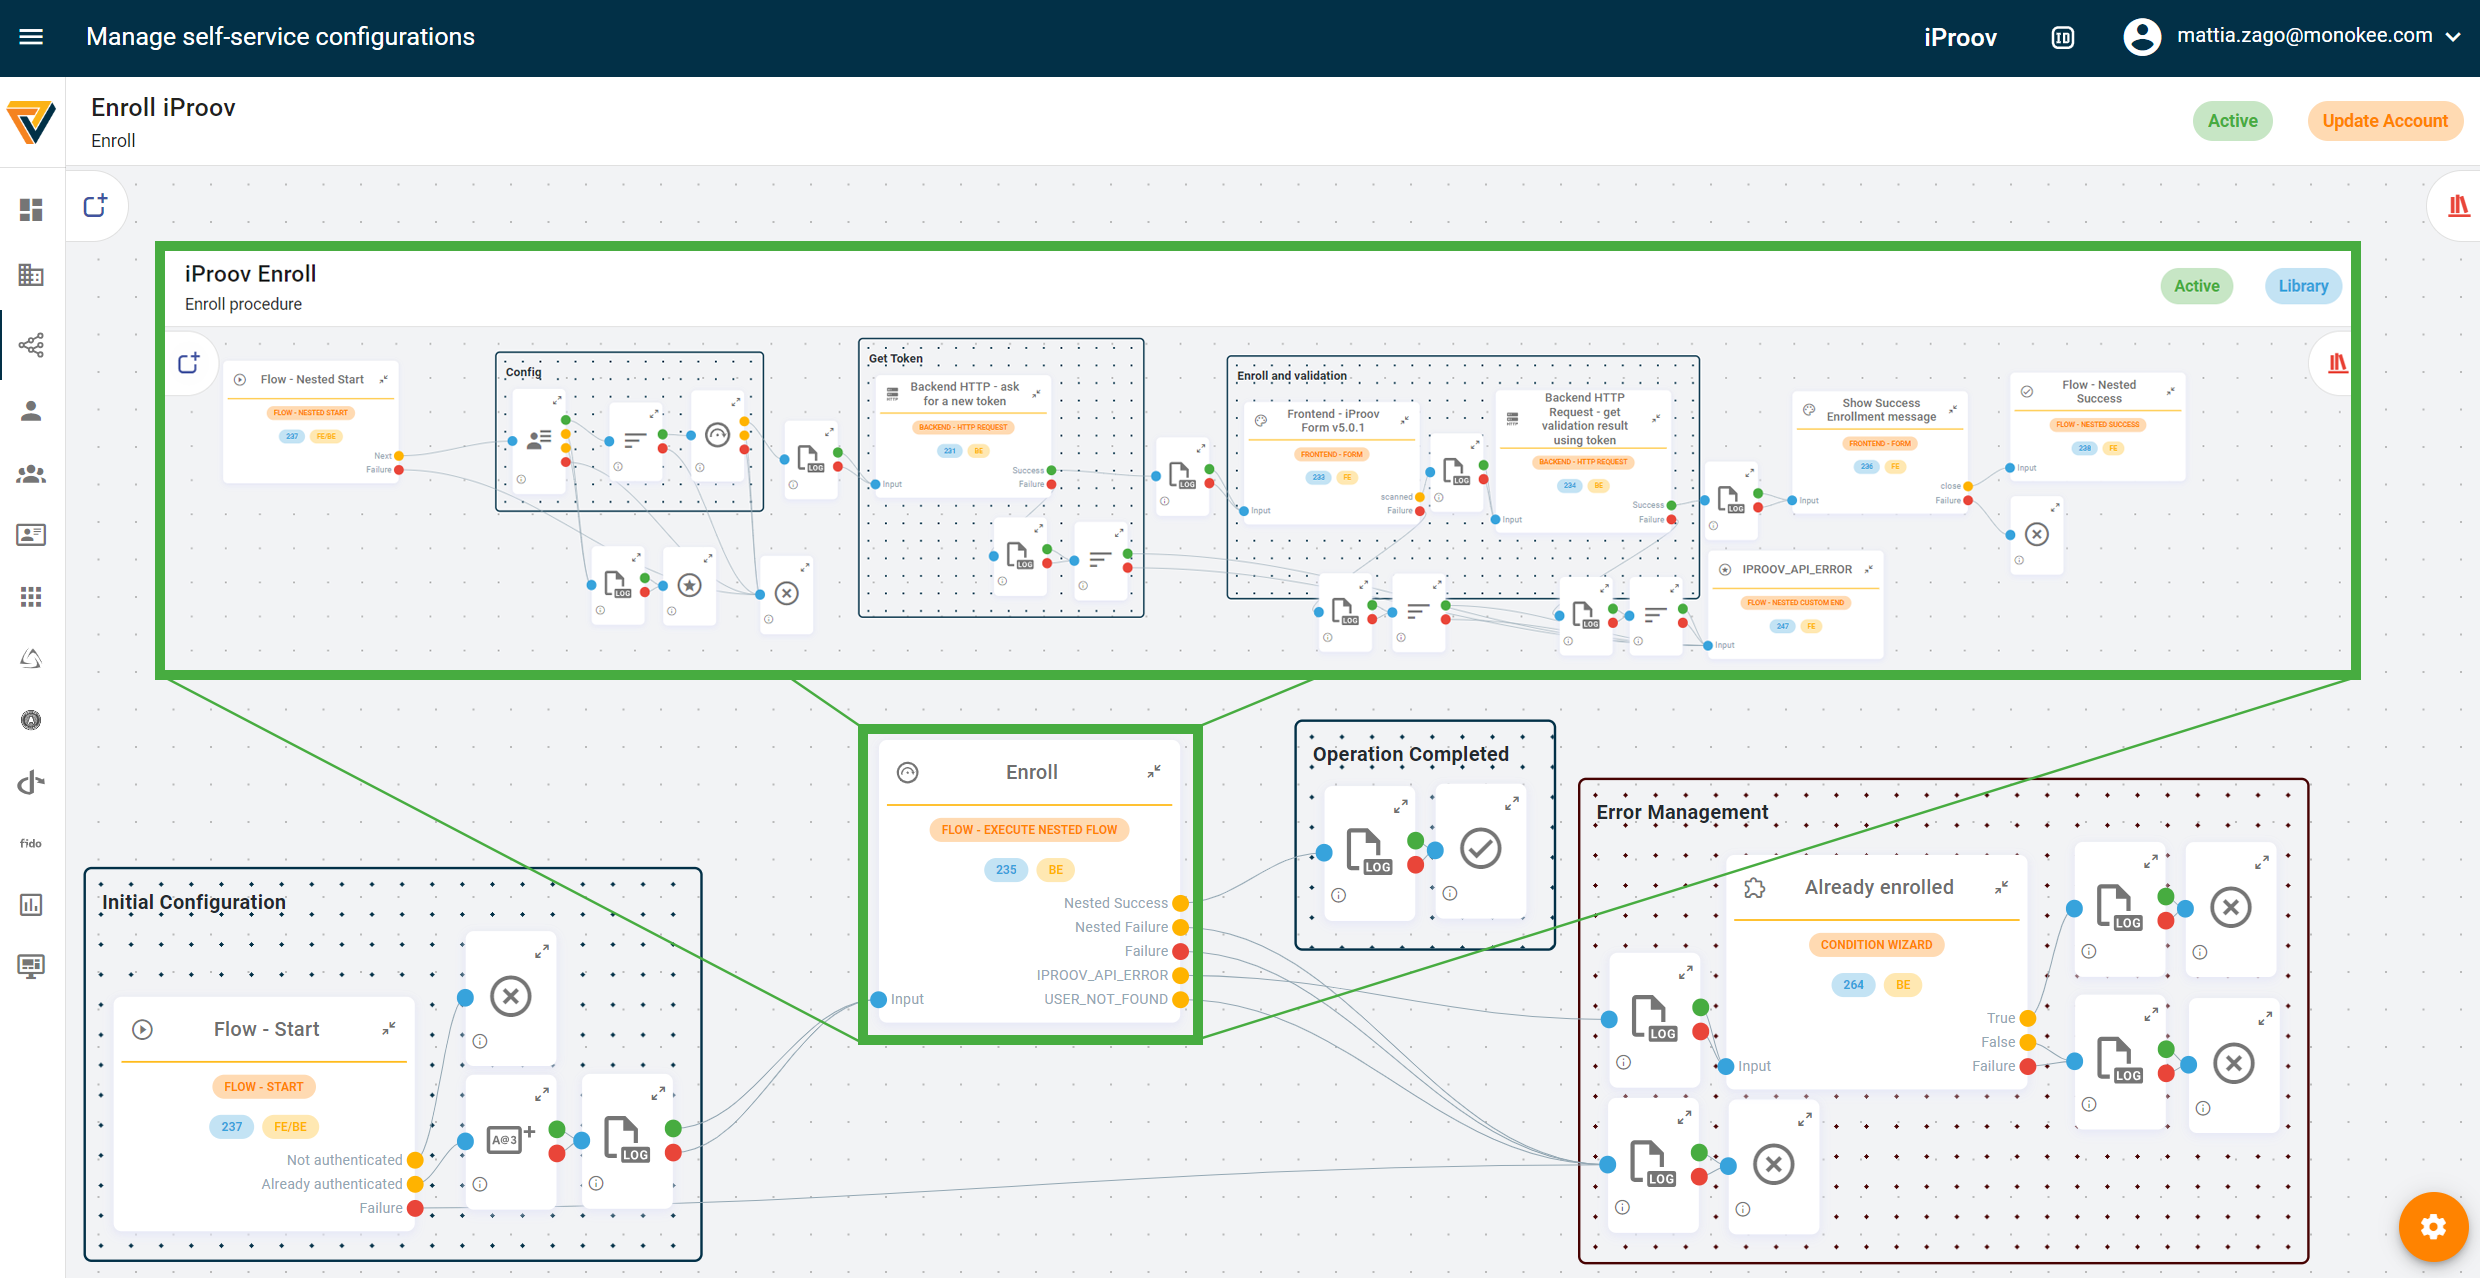
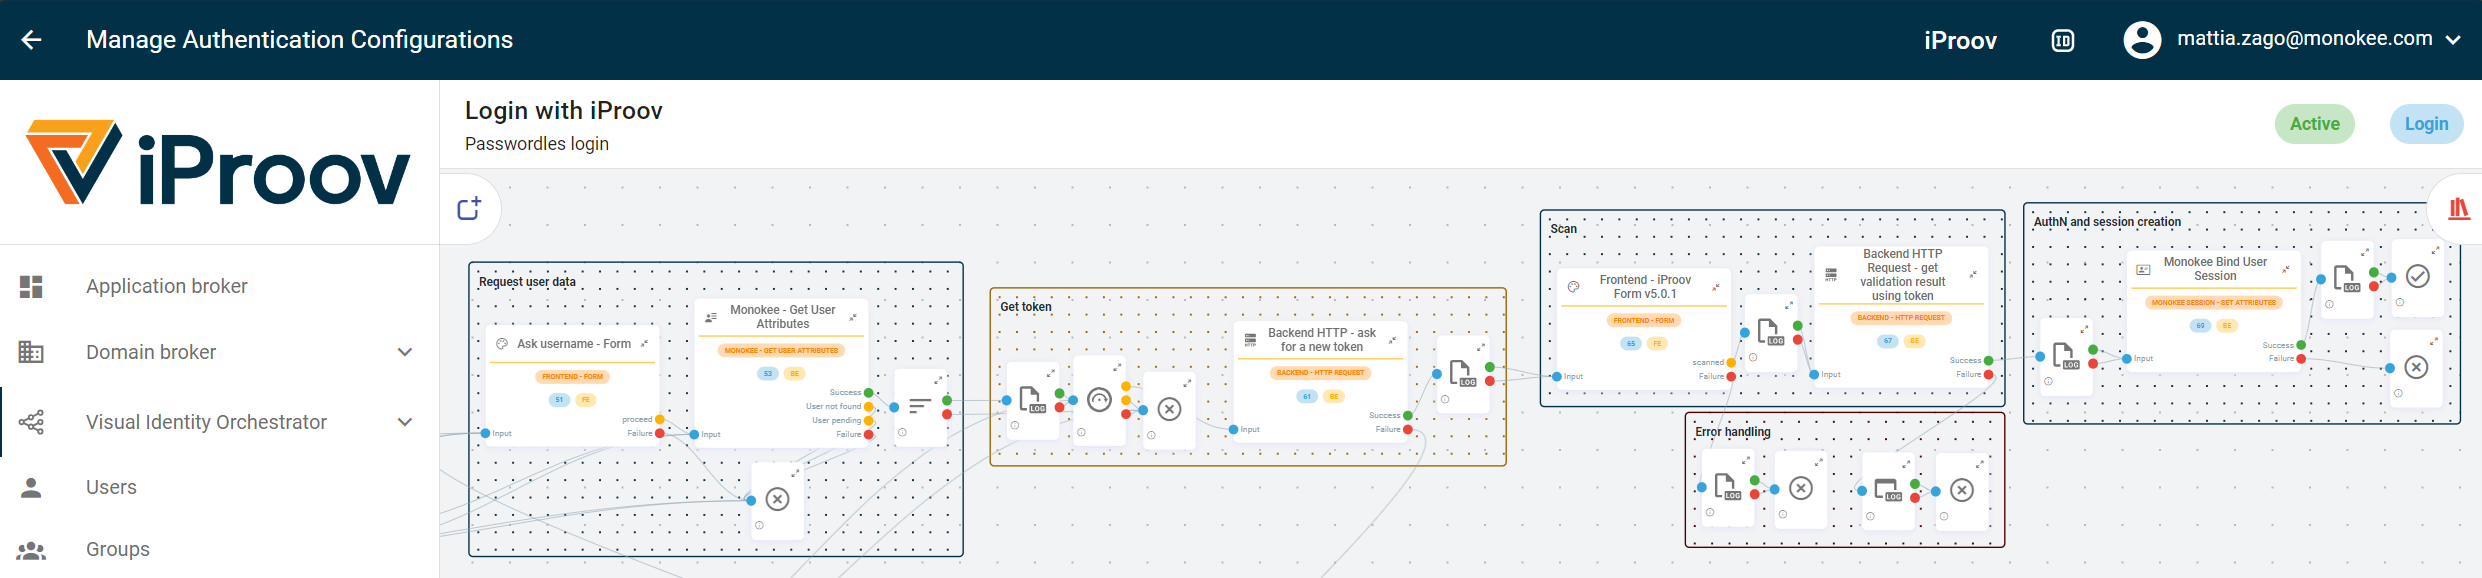
The integration is made of two separate flows — one for enrolment, one for authentication. Both use Monokee frontend form blocks to deliver the iProov scan to the user, then check the backend request status to confirm the process completed.
Enrolment flow
- Retrieve the authenticated user and set flow constants. The flow checks that the user is authenticated and holds valid data in Monokee, and sets the constants: iProov service provider base URL, API key and secret.
- Obtain a new iProov token. A backend API request to the service provider returns the token needed to proceed with the scan and to authenticate the user on the iProov side throughout.
- Show the scan form. A frontend form block imports the iProov SDK and presents the scan button.
- Check the scan result. After the scan, Monokee calls the service provider endpoint using the token obtained at the start.
- Confirm to the user. If everything succeeded, say so.
Authentication flow
- Split on whether the user is already authenticated. If they are not — they may be signing in with iProov — the flow asks for an email, checks they are registered in Monokee, and retrieves their data. If they already are, it simply retrieves the data.
- Set flow constants. As in the enrolment flow.
- Obtain a new iProov token. As in the enrolment flow.
- Check the scan result. As in the enrolment flow.
- Bind or refresh the session. On success, create a new session for the user and redirect them to the Monokee application broker.
Authentication with just-in-time enrolment
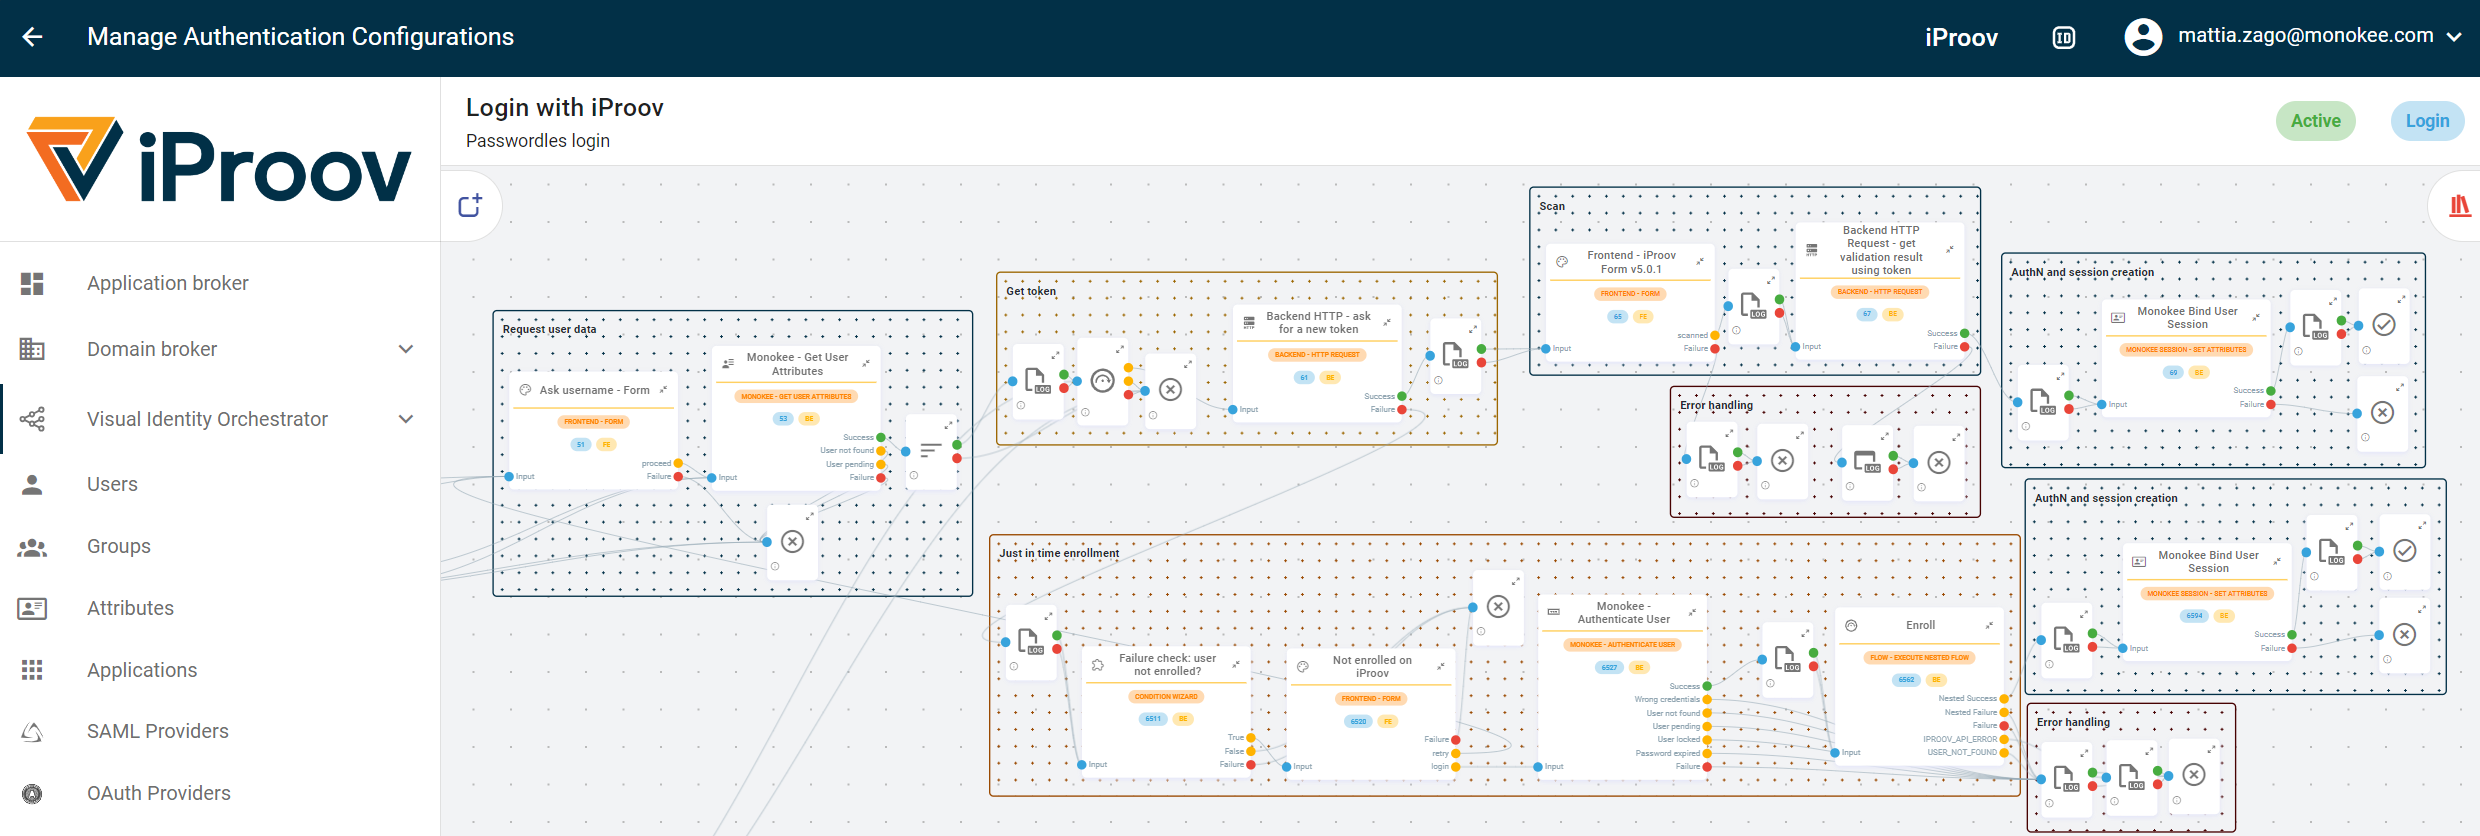
Suppose an organisation has just adopted iProov and now wants existing users to authenticate with it rather than with credentials. Those users are not enrolled yet, and sending them all through an enrolment campaign first is the kind of prerequisite that stalls a rollout.
Monokee handles it with a conditional branch that triggers on an API error code from iProov — the signal that this user is not yet enrolled. The flow falls back to a credential set, authenticates the user, and then runs the enrolment process as a single nested node before continuing. The user is enrolled during the login they were making anyway.
Why it matters
Both flows are built from the orchestrator’s blocks, which is what makes the result coherent rather than bolted together: enrolment, authentication and the fallback path are the same kind of object, edited in the same place, and changed without touching the applications behind them.
Together, iProov and Monokee let organisations onboard new users and authenticate existing ones with high assurance, on any device, without a password.
Where to go next
The orchestration model is described on the Visual Identity Orchestrator page, and the wider pattern of invoking verification where the risk appears on Customer Identity.